Instructor guide
Why we teach this lesson
Everyone should be using a version control system for their work, even if they’re working alone. There are many version control systems out there, but Git is an industry standard and even if one uses another system chances are high one still encounters Git repositories.
Specific motivations:
- Code easily becomes a disaster without version control
- Mistakes happen - Git offers roll-back functionality and easy backup mechanism
- One often needs to work on multiple things in parallel - branches solve that problem
- Git enables people to collaborate on code or text without stepping on each other’s toes
- Reproducibility: You can specify exact versions in publications enabling others to reproduce your work, and if bugs are found one can find out exactly when it was introduced
Most learners in a CodeRefinery workshop have developed code for a few years. A majority have already encountered Git and have used it to some extent, but in most cases they do not yet feel comfortable with it. They lack a good mental model of how Git operates and are afraid of making mistakes. Other learners have never used Git before. This lesson teaches how things are done in Git, which is useful for the newcomers, but also how Git operates (e.g. what commits and branches really are) and what are some good practices (e.g. how to use the staging area), which is useful for more experienced users.
Intended learning outcomes
By the end of this lesson, learners should:
- realize that version control is very important and Git is a valuable tool to learn and use
- understand that Git is configurable and know how to set basic configurations
- be able to set up Git repositories and make commits
- understand that information on commits, branches etc. are stored under
.git/, and have a mental model of how that relates to the working directory - have a mental model of the different stages a file can have in Git (untracked, modified, staged, unmodified)
- know how to write good commit messages
- have an idea of how the staging area can be used to craft good commits
- know how to undo commits using
git revertand discard changes usinggit checkout - understand that
git checkoutcan be dangerous if changes have not been staged - know how to create branches and switch between branches
- have a mental model of how branches work and get used to thinking of branches in a graphical (tree-structure) way
- know how to merge branches and understand what that means in terms of combining different modifications
- know how to resolve conflicts, or to abort conflicting merges
- realize that conflicts are generally a good thing since they prevent incorrect merges
- be able to set up a repository on GitHub and connect it with local repository
- push changes to a remote repository
- know a few ways to search through a repository and its history
- know about the different meanings of
git checkout, and realize how they’re in fact similar
How to teach this lesson
Things to prepare
In a typical workshop the optional in-browser episode is not taught. But if you intend to teach it:
Mirror a fresh https://github.com/coderefinery/example-project from https://github.com/bast/example-project.
Do not just fork it since it can confuse users sending pull requests.
Take first editor steps slowly
Some participants will be new to using a terminal text editor so please open, edit, and close the editor (Nano) slowly in first type-along sessions and exercises to avoid that participants will fall behind the instructor. At one point a student did not follow the file edits of the instructor, and to correct the mistake they had to do a manual merge, which they were not ready for.
Different ways to present
The whole lesson covers why you would use git, how to use it, and practical tips. The earlier lessons are long, the later ones go quite fast.
The “Basics” section is the core of how to use git, and from there sections do just what they say. “Basics”, “Branching and merging”, and “Conflict resolution” are the shortest basics of git (collaboration is another lesson).
“Motivation”, “Basics” and “Sharing repositories online” is the shortest path to a single-user Dropbox-like usage.
If your audience doesn’t need to be taught the “how” and only the “why”, you can present sections “Motivation” and “Tips”, which should explain the high-level picture, and they should use git better, if they already know the basics.
Optional sections: For a complete beginner exposed to version control the half day schedule is too long. These section can be skipped:
-
“Using the Git staging area” can be skipped but is somewhat useful. It would also make a good homework or advanced assignment.
-
“Git under the hood” can be skipped if time is tight - it is not important to typical use.
-
The short section “Sharing repositories online GitHub” is here to give people a very simple taste of remote mirroring, and can be skipped we are exposed to GitHub in another lesson on the same afternoon. Otherwise it can be skipped or moved to another module.
-
The “In-browser session” can be taught to audiences who need to be able to commit to existing repositories (e.g. documentation, webpages, …) but may not want to use command line.
How to use the exercises
Most episodes have standard exercises followed by optional (often more advanced) exercises for more experienced learners so they don’t get bored waiting for the newcomers. The instructor should briefly introduce the exercises and mention that after finishing the standard exercise (and indicating that using the green sticky) the learners can move on to the optional ones if they wish. When at least half of the learners have raised the green sticky the instructor should go through the standard exercise to describe its most important take-home messages. It’s also fine to briefly go though important points from the optional exercises, but don’t spend too much time on it since everyone will not have attempted them.
Why do we have the “Clean history” section?
We introduce git reset --hard in passing in the
“Clean history” section.
Motivation for this was to allow participants to experiment with the staging and “mess things up” but later be able to continue with branching and see the same things when inspecting git graph. The reset command is there introduced in passing. This can create confusion. But it is also important that participants see the same thing as on the big screen (they often notice the tiniest differences and ask about it).
“Test your understanding” exercises
Some episodes have a “test your understanding” exercise at the end which is intended as formative assessment, i.e. an activity that provides feedback to instructors and learners on whether learning objectives are being met. The instructor should end each episode by posing the “test your understanding” multiple-choice question, giving learners a minute to think about it, and then asking for the right answer or asking learners to raise their hands to signal which answer they think is correct.
Conflict resolution
We use screenshots from a violent video game in the section on conflict resolution, but it should be emphasized that conflicts are a good thing since otherwise collaborators would overwrite each other’s changes. Git saves us from this situation by producing conflicts.
Inspecting history
Key lesson is how to find when something is broken or what commit has broken the code.
It can be useful to emphasize that it
can be really valuable to be able to search through the history of a project
efficiently to find when bugs were introduced or when something changed and
why.
Also show that git annotate and git show are available
on GitHub and GitLab.
When discussing git annotate and git bisect the “when” is more important than “who”. It is not
to blame anybody but rather to find out whether published results are affected.
Discuss how one would find out this information without version control.
Questions to involve participants:
- Have you ever found a bug in your code and wondered whether it has affected published results?
- Have you ever wondered when, and by whom, a particular line of code was introduced?
- Have you ever found out that a code behaves differently than it used to but you are not sure when precisely this changed?
Confusion during git bisect exercise:
Learners may get stuck in the git bisect exercise if they incorrectly assign a commit
as bad or good.
To leave the bisect mode and return to the commit before git bisect start was issued,
one can do
$ git bisect reset
and start over if needed.
Live better than reading the website material
It is better to demonstrate the commands live and type-along. Ideally connecting to examples discussed earlier.
Log your history in a separate window
The screencasting (shell window cheatsheet) hints have been moved to the presenting manual.
Create a cheatsheet on the board
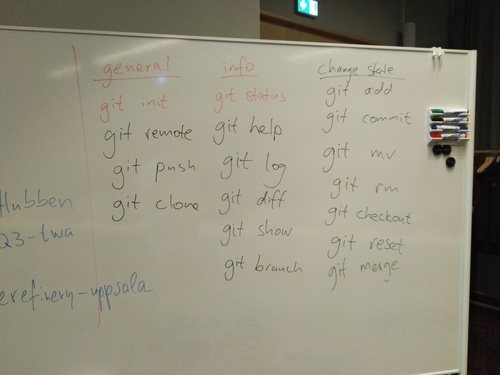
Create a “cheatsheet” on the board as you go. After each command is introduced, write it on the board. After each module, make sure you haven’t forgotten anything. Re-create and expand in future git lessons. One strategy is:
- a common section for basic commands:
init,configclone,help,stash - info commands, can be run anytime:
status,log,diff,graph - A section for all the commands that move code from different states:
add,commit, etc. See the visual cheat sheet below.
You can get inspired by http://www.ndpsoftware.com/git-cheatsheet.html to make your cheatsheet, but if you show this make it clear there are far, far more commands on there than you need to know right now., and it’s probably too confusing to use after this course. But, the idea of commands moving from the “working dir”, “staging area”, “commits”, etc is good.
Example:
We also recommend to draw simple diagrams up on the board (eg: working directory - staging area - repository with commands to move between) and keep them there for students to refer to.
Draw a graph on the board
Draw the standard commit graphs on the board early on - you know, the
thing in all the diagrams. Keep it updated all the time. After the
first few samples, you can basically keep using the same graph the
whole lesson. When you are introducing new commands, explain and
update the graph first, then run git graph, then do the command,
then look at git graph again.
Repeat the following points
-
Always check
git status,git diff, andgit graph(our alias) before and after every command until you get used to things. These give you a clear view into what is going on, the key to knowing what you are doing. Even after you are used to things… anytime you do something you do infrequently, it’s good to check. -
git graphis a direct representation of what we are drawing on the board and should constantly be compared to it. -
Once you
git addsomething, it’s almost impossible to lose it. This is used all the time, for example once you commit or even add it is hard to lose. Commit before you merge or rebase. And so on.
Start from identical environment
You probably have a highly optimized bash and git environment - one
that is different from students. Move .gitconfig and .bashrc out
of the way before you start so that your environment is identical to
what students have.
Sections to skip when teaching live
The discussion Git vs. Subversion and Git vs. Mercurial in the Motivation section is useful to have in the written material but should be skipped during the lesson unless there are questions.
Typically only very few learners have background in Subversion or Mercurial and the risk is to “waste” 10 minutes on a discussion that nobody can relate to and benefit from.
Todo
git restore and git switch were added in git 2.23 (released
2019-08-16). Sometime much later (2021, 2022, or 2023) perhaps, the
older alternatives can be demoted or removed.